Creating a Cellular Testbed with YateBTS and srsLTE
Have you ever wondered how your smartphone communicates over-the-air? How calls and SMSs reach your phone from across the world? What about how your phone decodes over-the-air messages? Does it do it correctly and what happens if it doesn’t? Well these answers and more lie within the 2 - 5G cellular protocols and their implementations. Understanding and setting up a cellular testbed for this kind of exploration can be a difficult and frustrating process. Without a background in signal processing, cellular protocol conventions, or the right equipment, debugging why a cellular testbed isn’t working can be a pain, to say the least. In this tutorial we’re going to detail the exact steps my guest author Tyler Tucker and I took to get a 2G (GSM) and 4G (LTE) testbed up and running. In cellular terminology these are known as the BTS and eNodeB for GSM and LTE respectively, but throughout we’ll stick with base station. To get a base station up and running you need two things: a software defined radio (SDR) for the radio frontend and a software station implementation that can talk to your SDR.
If you have the equipment and are properly licensed, you’ll legally be able to setup a cell site of your own. But wait, what if you don’t have a license? Do you really need one and how can you get one? Well sorry, this is one of those “if you have to ask you can’t afford it” deals. Technically there are the industrial, scientific and medical (ISM) band frequencies, but even these don’t give you free reign to transmit; devices (and humans) transmitting in these bands still need FCC approval and testing. This means you need to be ethical when performing cellular, or any radio-based research for that matter. Violations of FCC regulations can at best land you a hefty fine. Some laws in other countries are so strict that even possessing an SDR, let alone transmitting, can get you thrown into jail. Even if you did have the required spectrum licenses to transmit (which is highly unlikely), you could still cause serious harm if you by accident intercept or infer with emergency calls from legitimate subscribers. Some of you may even have your amateur radio tech/general/extra class license, but transmitting potentially encrypted cellular traffic is still prohibited to the best of my knowledge. In general some maxims to follow include, but are not limited to:
- DO NOT transmit on any frequency that you do not have the license(s) for
- DO NOT infer with any other transmitting devices, especially critical infrastructure like other commercial towers
- DO consult all applicable laws and regulations for your country/state/county/company before experimenting
- DO perform experiments in an RF-shielded environment (Faraday cage) or with the minimum required power
When it comes to SDRs, rules or not, the genie is out of the bottle and laws won’t stop everyone. Please still exercise caution to minimize risk to you and those around you and don’t use this for malicious purposes. With the disclaimers out of the way, lets dive in.
SDRs & Software
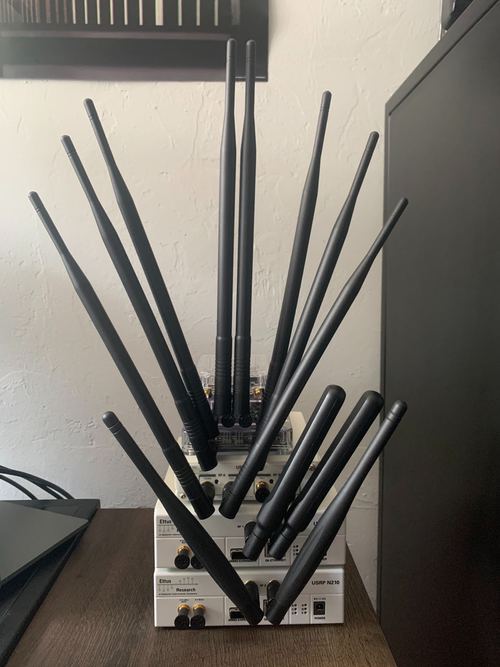
For our SDRs we used four different kinds across two base station implementations when trying to get our testbed working properly. Here are the SDRs we purchased (keep reading, you don’t need all of these):
| Name | Cost | Interface | Base Clock | Performance |
|---|---|---|---|---|
| bladeRF x40 | $420 | USB 3.0 | 38.4MHz | 300MHz - 3.8GHz |
| bladeRF 2.0 xA4 | $480 | USB 3.0 | 61.44MHz | 47MHz to 6GHz |
| USRP N210 | $2,048 | RJ-45 (1000BASE-T) | 100MHz | DC - 6GHz |
| USRP B210 | $1,282 | USB 3.0 | 61.44MHz | 70MHz - 6GHz |
For the base stations we chose YateBTS for GSM and srsLTE for LTE. These are both open source and their code is relatively easy to compile and hack on. So why didn’t we just stick with one SDR? Well every step along the way revealed some obscure software or hardware incompatibility that left us having try out many different configurations. Here’s a list of the main issues we encountered:
- Bought two USRP N210’s to setup srsLTE. Spent a month trying to get these to work only to realize that srsLTE needs an SDR with a base clock that is a multiple of 1.92MHz (100MHz is not). It could in theory work with other clock rates by performing resampling, but it does not do this.
- Tried to get the USRP N210’s working with YateBTS latest checkout only to realize that they dropped support for the UHD driver. Spent a while going through commit logs to find an old working revision that supported UHD.
- Tried to get the bladeRF 2.0 xA4 working with YateBTS because it mentioned it was supported. Had multiple issues due to YateBTS writing their own radio driver instead of using the official bladeRF libraries. Ended up having to buy the bladeRF x40 (older model) and use an older FPGA image to get devices to connect.
- Tried using the bladeRF x40 for srsLTE as srsLTE mentioned “bladeRF support”, but to no avail. Ended up having to use the newer xA4.
Hopefully this tutorial will let you skip straight to the right SDR/base station pair and avoid some of the pain (and cost).
Run YateBTS with USRP N210 or bladeRF x40/x115
YateBTS allows anyone with a Linux distro to run their own GSM base station. For this section, we are using Ubuntu 18.04 LTS to run YateBTS, but we also had luck with 16.04. SDR software in our experience has historically struggled when tested on other Linux distributions (including other versions of Ubuntu), so keep this in mind when attempting to run your base station. In the newest versions of YateBTS, only bladeRF support is enabled, so we also talk about how we used an old, modified version of the YateBTS repository to get it working with a USRP N210. However, once the code is installed and configured properly, the operation should be nearly identical for the two different versions. Also, while people have gotten YateBTS to work with the newer bladeRF 2.0 xA4/xA9 family, these devices have a much lower chance of working properly and probably require more customization.
Installation
Install Dependencies
These programs are all necessary to run YateBTS with either SDR.
# Generic dependencies
sudo apt-get install subversion autoconf libgsm1-dev libgusb-dev libusb-1.0-0 libusb-1.0-0-dev
If you’d like the optional YateBTS web interface you can install the below. This tutorial assumes you have done this step.
# Web dependencies
sudo add-apt-repository ppa:ondrej/php
sudo apt-get update
sudo apt-get install php5.6 apache2
bladeRF
sudo add-apt-repository ppa:bladerf/bladerf
sudo apt-get update
sudo apt-get install bladerf
sudo apt-get install libbladerf-dev
sudo apt-get install bladerf-fpga-hostedxa4
N210
sudo apt-get install libuhd-dev libuhd003.010.003 uhd-hostCreate Yate Group
YateBTS uses a group called yate to handle permissions, so create a yate group and add your account to this group.
sudo addgroup yate
sudo usermod -a -G yate <username>
Install Yate
N210
We will install yate to the system using subversion to fetch the code. Ensure that you use the correct version of the code when installing with the -r 5968 argument.
svn checkout -r 5968 http://voip.null.ro/svn/yate/trunk yate
cd yate
./autogen.sh
./configure
sudo make install-noapi
You may run into an OpenSSL error while building. If this occurs, you need to perform a minor patch in the file ./yate/modules/openssl.cpp based on this file.
bladeRF
Nuand hosts a tar file which includes Yate, YateBTS, and bladeRF FPGA images.
wget https://nuand.com/downloads/yate-rc.tar
mkdir yate-rc
tar -xf yate-rc.tar -C yate-rc
cd yate-rc/yate
./autogen.sh
./configure --prefix=/usr/local
make
sudo make install-noapi
sudo ldconfig
Install YateBTS
N210
Now it’s time to install YateBTS. Here, we use our own modified codebase for YateBTS, as we have confirmed that it works with the N210.
git clone https://github.com/grant-h/YateBTS-USRP
cd YateBTS-USRP
./autogen.sh
./configure
sudo make install
If it complains about bladeRF library, uninstall bladeRF from system, re-run the command, then reinstall bladeRF.
bladeRF
cd yate-rc/yatebts
./autogen.sh
./configure --prefix=/usr/local
make
sudo make install
sudo ldconfig
Add/Edit Files
Here’s where the yate group comes into use. We change the owner of the configuration files from root to yate.
sudo touch /usr/local/etc/yate/snmp_data.conf /usr/local/etc/yate/tmsidata.conf
sudo chown root:yate /usr/local/etc/yate/*.conf
sudo chmod -R a+rw /usr/local/etc/yate
Link Web GUI to Apache (optional)
YateBTS provides a local Web GUI as an alternative to editing files. The files that the GUI edits are found in /usr/local/etc/yate, with the most important files being ybts.conf and subscribers.conf. These two files contain the settings for the radio access network and the mobile stations, respectively.
To use the GUI, we will link the needed files to the directory used by Apache when hosting web pages. YateBTS changed the name from NIB to NIPC between these two different releases, so that is why we have slightly different instructions for each SDR.
Enter the web directory: cd /var/www/html
- N210 »
sudo ln -s /usr/local/share/yate/nib_web/ nib - bladeRF »
sudo ln -s /usr/local/share/yate/nipc_web/ nipc
Web GUI Options
In a web browser, type localhost/nib (if using N210) or localhost/nipc (if using bladeRF) in the search bar. If the installation succeeded, you should see a web page like this:
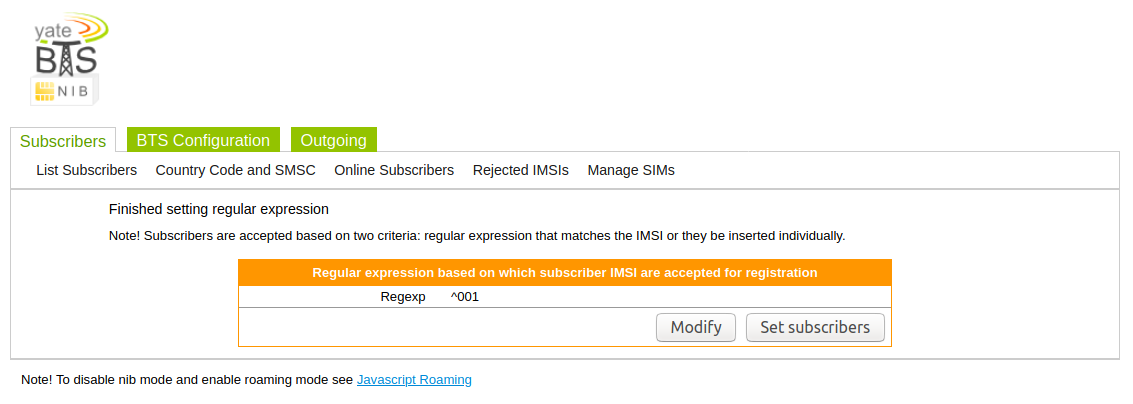
Subscribers
This page represents the condition needed for a mobile station to connect to the network, which is based only on its IMSI. You can either have Yate accept IMSIs by regular expression (regexp), shown in the picture, or manually set each subscriber. When accepting by regexp, Yate will check that the IMSI meets the condition before allowing it to connect. In the picture, regexp is set to ^001, meaning that any IMSI beginning with 001 will be accepted. When accepting by explicit subscribers, Yate will check if the entire IMSI matches one the entries in a table that you create. This option allows for greater customization, as each IMSI entry can be given a set phone number, IMSI type, Ki, etc. Conversely, phones accepted by regexp will be allocated a unique phone number.
Please note that you need to restrict your IMSI accept conditions as much as possible to prevent foreign devices from connecting to your network.
These settings can also be changed in /usr/local/etc/yate/subscribers.conf
BTS Configuration
Navigate to the BTS Configuration tab to change network settings for both your SDR and computer. The home page should resemble this:
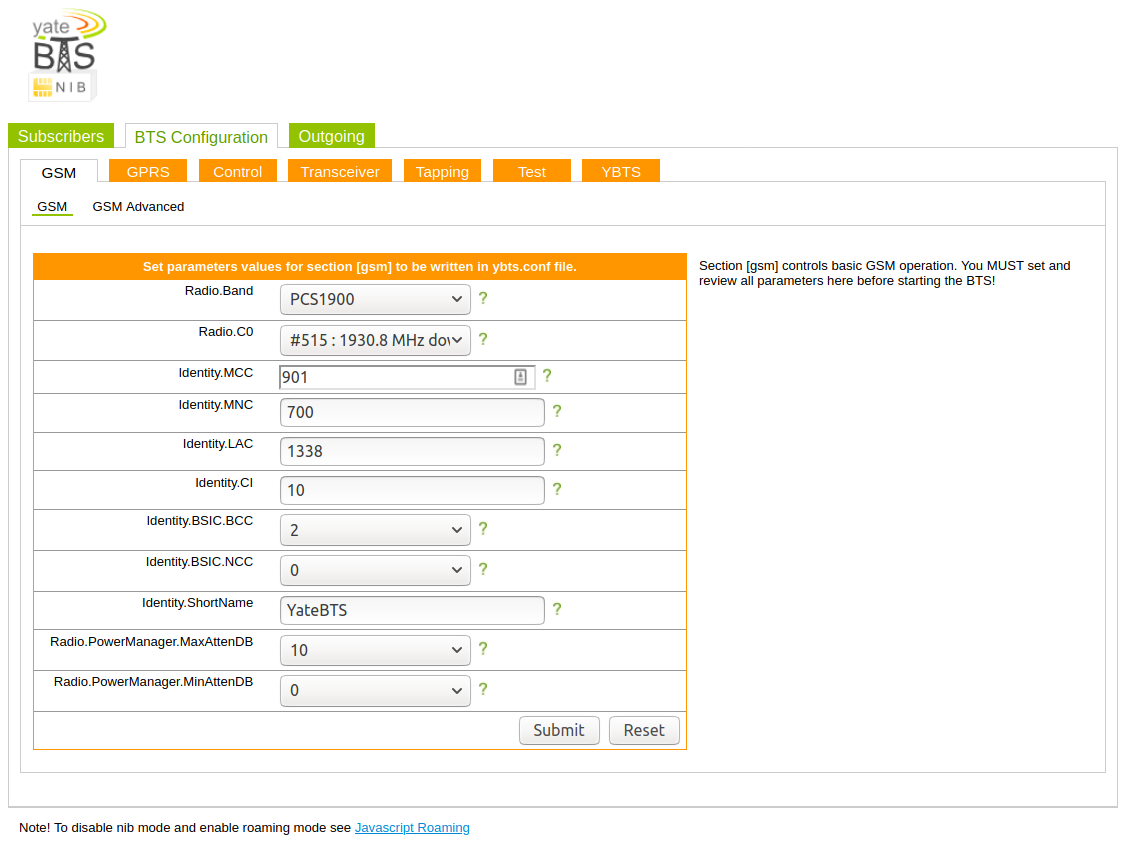
RAN Settings
Here you can choose what band and frequency your base station will use, along with what Mobile Country Code (MCC) and Mobile Network Code (MNC) it will transmit. We chose a radio band used in our country, along with a frequency that wasn’t used in our area. Furthermore, we chose our MCC and MNC to match those of our IMSIs. The other settings on the GSM page shouldn’t be necessary to get Yate up and running properly, along with those of the GSM Advanced page.
Reminder: At the very least ensure that you are not transmitting on any frequencies that are used by local base stations in your area. This can cause interference for both Yate and the local BTS. Also read the settings to adjust the power level (dB) as the defaults are quite high, which may cause unintended interference with nearby subscribers. (read: random phones connecting to your network)
These settings can also be changed in /usr/local/etc/yate/ybts.conf
GPRS Settings
Navigate to the GPRS tab to change settings for General Packet Radio Service (GPRS) support with YateBTS. GPRS gives mobile stations internet access over the GSM network. YateBTS achieves this by forwarding IP packets from the mobile station to an internet interface of your computer.
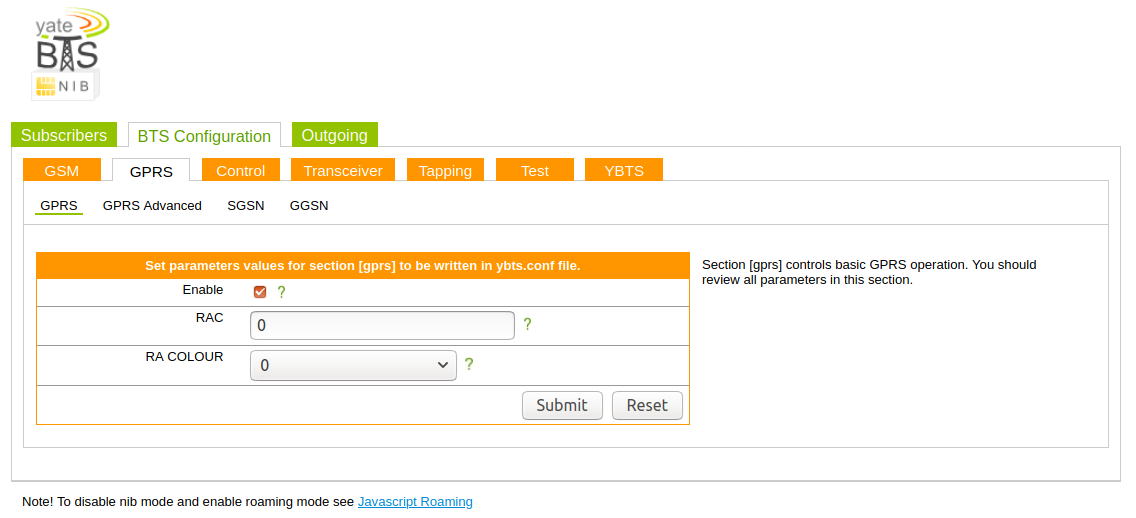
If you would like to use GPRS, check the box next to Enable like what is shown in the picture above. Next, navigate to the GGSN tab and paste your computer’s DNS settings as a space-separated list in the DNS field. We will setup IP forwarding later on.
Transceiver Settings
Navigate to the Transceiver tab, still under BTS Configuration.
N210
Change Path to ./transceiver-uhd, and change Args to addr=192.168.10.2. This IP address corresponds to that of your USRP N210, so ensure that these values match.
bladeRF
A bladeRF device will work with transceiver set to the default value of ./transceiver with the Args field left blank.
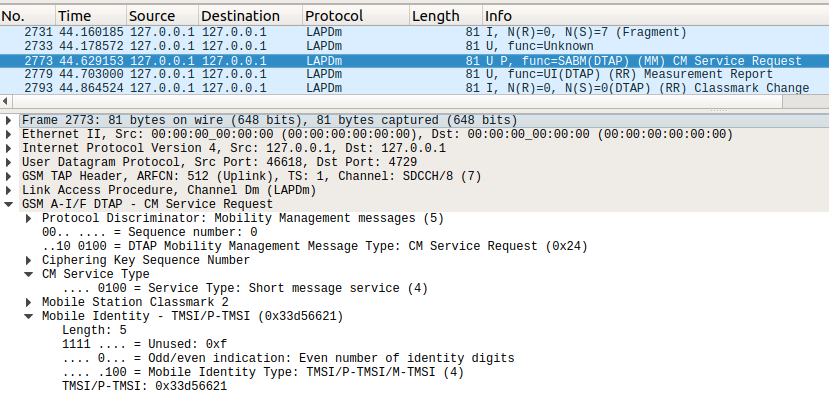
Tapping Settings
Navigate to the Tapping tab, still under BTS Configuration. Tapping sends GSM and GPRS packets to a specified IP address (127.0.0.1 for your local machine). Using Wireshark, you can view and save these messages by inspecting the loopback (lo) address. An example of a GSM packet in Wireshark is shown below:
To get Wireshark for Ubuntu, run sudo apt-get update wireshark
There are many more settings in YateBTS, but these settings should enable you to have a working GSM air interface.
IP Forwarding for GPRS
To use GPRS with YateBTS, we need to setup IP forwarding to complete our GPRS network using Linux iptables. These instructions assume that the MS.IP.Base setting in the GGSN tab of the YateBTS GUI is set to its default value of 192.168.99.1 (simply change the value below if this is not the case). Also, replace <wlan> in the code below with the name of your internet network adapter.
sudo iptables -A POSTROUTING -t nat -s 192.168.99.0/24 ! -d 192.168.99.0/24 -j MASQUERADE
sudo iptables -A FORWARD -i <wlan> -o sgsntun -m state --state RELATED,ESTABLISHED -j ACCEPT
sudo iptables -A FORWARD -i sgsntun -o <wlan> -j ACCEPT
sgsntun is the name of the network interface created by YateBTS.
Running YateBTS
bladeRF
Before running Yate, we should load the FPGA image that matches your device. These files exist in the yate-rc directory that we downloaded from Nuand. To load the image, run bladeRF-cli -l /your-path/yate-rc/hostedx40.rf. You can simply changed hostedx40.rbf to hostedx115.rbf if you’re using a bladeRF x115.
Run
If the above installation was successful, you can start YateBTS with the commmand sudo yate (sudo is required for real-time thread priority).
Make sure your computer supports USB 3.0 SS, and that the bladeRF is plugged directly into the bus (not through a hub or a front port). Also make sure that your Yate CPU usage isn’t stuck close to 100%, otherwise TX frames may be dropped.
Phone Settings
To connect a phone to the network, you’ll have to enter the Cellular Networks settings of your phone. Set the Preferred network type to 2G, then navigate to Network Operators > Search networks. The phone will perform a network scan, printing out the results for you to choose from. Your YateBTS network will be identified by the MCC and MNC that you set earlier. Based on the picture shown above (under BTS Configuration) for example, the network will appear as 901 700. Simply click on the number corresponding to your network, and the phone will attempt to connect to the network. To use GPRS, we need to add an Access Point Name (APN). To do this, find the Access Point Names setting, then add an APN where Name can be whatever you want while APN needs to be set to internet.
Testing
Upon first registration, your phone should receive a SMS message from the network giving it an allocated phone number. Use this number when sending and receiving cellular traffic between multiple phones on the same BTS. YateBTS provides a chatbot that you can send SMS messages to at phone number 35492.
Running srsLTE with bladeRF 2.0 xA4/xA9 or USRP B210
srsLTE allows anyone with a Linux computer and specific SDR hardware to run their own LTE base station. We have successfully run base stations with the bladeRF 2.0 xA4 and the USRP B210 on Ubuntu 18.04 LTS. Note that we have used an older release of the srsLTE software to get it working with the bladeRF 2.0 xA4, as the newest release had issues with this device in particular. We then tested this same version with a USRP B210 and confirmed that it works with that device as well.
bladeRF
sudo apt-get install libusb-1.0-0-dev libusb-1.0-0 build-essential cmake libncurses5-dev libtecla1 libtecla-dev pkg-config git wget
git clone https://github.com/Nuand/bladeRF.git
cd bladeRF/host
mkdir build
cd build
cmake -DCMAKE_BUILD_TYPE=Release -DCMAKE_INSTALL_PREFIX=/usr/local -DINSTALL_UDEV_RULES=ON ../
make && sudo make install && sudo ldconfig
Download bladeRF FPGA image
Here we are downloading the FPGA image for our bladeRF device from Nuand’s website. If you’re using a bladeRF xA9, simply change the file name to hostedxA9.rbf.
wget https://www.nuand.com/fpga/v0.11.0/hostedxA4.rbf
USRP B210
sudo apt-get install libuhd-dev libuhd003.010.003 uhd-host
Install srsLTE from source at old commit
sudo apt-get install cmake libfftw3-dev libmbedtls-dev libboost-program-options-dev libconfig++-dev libsctp-dev
git clone https://github.com/srsLTE/srsLTE.git
cd srsLTE
git checkout release_19_06
mkdir build
cd build
cmake ../
make
make test
sudo make install
sudo ldconfig
srslte_install_configs.sh user
Edit srsLTE settings
Evolved Packet Core (EPC) Settings
vim ~/.config/srslte/epc.conf
	# Uncomment/Change these lines
	dns = <Your computer's DNS setting>
Evolved Node B (eNB) Settings
vim ~/.config/srslte/enb.conf
	# Uncomment/Change these lines
	tx_gain = 100

	# If using bladeRF
	device_name = bladeRF

	# If using B210
	device_name = UHD

	nof_phy_threads = 3
	max_prach_offset_us = 90
SIM Card Database Settings
For our tests, we used sysmocom USIM cards that can be purchased at http://shop.sysmocom.de/products/sysmousim-sjs1-4ff (make sure you choose the right form-factor). Each card will be provided with an IMSI, a Ki, an OPC, and more. We need this information to fully connect a phone to our network. Simply add an entry for each SIM card into your user_db.csv file. In our tests, the remaining fields do not have to be unique to each SIM (e.g. 9001,0000000003bc,7,dynamic). Here’s what your CSV may look like (minus sensitive values):
ue3,mil,<IMSI>,<Ki>,opc,<OPC>,9001,0000000003bc,7,dynamic
Make sure not to have any trailing whitespace or extra newlines in this file, otherwise it won’t be loaded correctly.
Configure Networking
To give your devices a proper internet connection, we need to set up IP forwarding to forward IP packets from the network interface created by srsLTE to the network interface that your computer uses to access the internet.
IP Forwarding
sudo vim /etc/sysctl.conf
	# Add/Uncomment
	net.ipv4.ip_forward = 1
	sysctl -p
IP Tables
srsLTE provides a script for connecting the LTE network interface with your computer’s network interface. The script can be run as srsepc_if_masq.sh <wlan> where <wlan> is the name of the interface that your computer uses to access the internet.
If this script fails to work, use these three commands instead:
sudo iptables -t nat -A POSTROUTING -o <wlan> -j MASQUERADE
sudo iptables -A FORWARD -i <wlan> -o srs_spgw_sgi -m state --state RELATED,ESTABLISHED -j ACCEPT
sudo iptables -A FORWARD -i srs_spgw_sgi -o <wlan> -j ACCEPT
Run srsLTE
bladeRF
We must load the FPGA image before running srsLTE.
bladeRF-cli -l /path_to_rbf/hostedxA4.rbf
Run
In two separate terminals, run these commands.
sudo srsepc
sudo srsenb
Note that srsLTE may take several minutes before accepting a new connection from a device.
Phone Settings
To connect a phone to the network, you’ll have to enter the Cellular Networks settings of your phone. Set the Preferred network type to LTE, then navigate to Network Operators > Search networks. The phone will perform a network scan, printing out the results for you to choose from. Your YateBTS network will be identified by the MCC and MNC that you set earlier. If you’ve left these settings default, your network with appear as something like TEST_PLMN or possibly 001 001. Simply click on the number corresponding to your network, and the phone will attempt to connect to the network. To use data services, we need to add an Access Point Name (APN). To do this, find the Access Point Names setting, then add an APN where Name can be whatever you want while APN needs to be set to srsapn.
If all is working well, you should be able to stream a YouTube video from your cellular network!
Onwards
If you made it this far, I hope you were successful in getting Yate or srsLTE up and running. If not, please leave a comment below so we can try and work out any issues you are having.